SQL 2005 and 2008 connectivity Issues After Changing the System Name (Computer Name)


Hi All,

In My  experience I have faced so many SQL issue due to the Change of System Name (Computer Name) after installed and configured SQL server .Some of the issues are like the followings

  • Not able to login with the Instance Name
  • Not able to create or edit publications

When we tried to work with publication we might get the following errors

“SQL Server is unable to connect to server ‘ServerName’

Additional information: SQL Server replication requires the actual server name to make a connection to the server. Connections through a server alias, IP address, or any other alternate name are not supported. Specify the actual server name, ‘Server Name’. (Replication. Utilities)”

So when Ever we need a change in the name of the System which we installed SQL Server

Use the following Query and stored procedure to update in in the SQL schema

Query to check the current System Name with SQL

Select @@servername

And if you get the null value or the old value, use the followings to update the same

Use Master
go
exec Sp_DropServer ‘OldName’
go
Use Master
go
exec Sp_Addserver ‘NewName’, ‘local’
go

Or Just use it as simple

Type   Sp_DropServer ‘OldName’

and press Execute or F5

Type  Sp_Addserver ‘NewName’, ‘local’

and press Execute or F5

Then stop and Start SQL Services

Cheers…!!!

Leave a comment

Filed under SQL, Uncategorized

Convert SQL 2008 Database to SQL 2005 ( How to Use SQL 2008 Database to SQL 2005 )


In some times we need to back up Database from Microsoft SQL server 2008 and restore it in Microsoft SQL server 2005 , But it is not possible to back up a higher version Database and restore in lower version with normal way

So that we have to try for an alternative method, here we use SQL script for this purpose

To use Database script method  to take Backup

Login in to your SQL 2008 with super user privilege >>>>>>

Right click the Database which you want to back up>>>  click “Tasks”

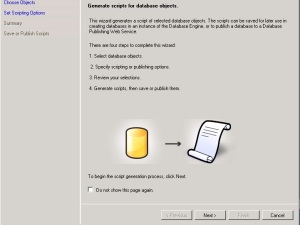
Click on ” Generate Script “

Click “ Next “

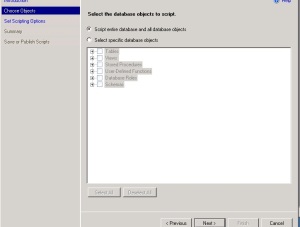
Select   “entire Database and all database objects” option

Click “Next”

In Output Type

Select “save script to a specific location ”

Select “Save file ” and “Unicode text”

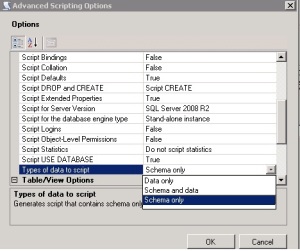
And then Click on “ Advanced “

Change following fields

Script for server version = SQL server 2005

Types of Data to script = Schema and Data

Then Click “Ok”  >>>  Select destination location to save script

Click “Next” >>> Click “Next”

Click “Finish”

Restore Script in SQL Server 2005

Open the Script file in SQL Management studio

Change the .Mdf and .LDF location in the script before execute

    CREATE DATABASE [StockTraderDB] ON  PRIMARY

( NAME = N’StockTraderDB’,

FILENAME = N’c:\Program Files\Microsoft SQL Server\MSSQL10.SQLEXPRESS\MSSQL\DATA\StockTraderDB.mdf ,

 SIZE = 4352KB , MAXSIZE = UNLIMITED, FILEGROWTH = 1024KB )

 LOG ON

( NAME = N’StockTraderDB_log’,

FILENAME = N’c:\Program Files\Microsoft SQL Server\MSSQL10.SQLEXPRESS\MSSQL\DATA\StockTraderDB_log.LDF’,

 SIZE = 6272KB , MAXSIZE = 2048GB , FILEGROWTH = 10%)


Then Execute

Enjoy !!!!

Leave a comment

Filed under SQL

Enable and Administrate Forefront online protection for exchange (FOPE) With Microsoft BPOS


If you are a Microsoft BPOS customer and uses online exchange you might not aware about “Forefront online protection for exchange” unless you get any quarantine spam notification mail .This is a feature to prevent spam/virus filtering

By default settings if any of the user in your online exchange (BPOS /Office 360) get spam mails it will quarantine the message and send one notification mail to user once in 3 days

As an admin of your company you might need to administer this feature So Microsoft will provide you the access .For that you need to create a support ticket on your BPOS admin console

To create ticket

Login to your Admin console (eg: https://admin.emea.microsoftonline.com) à go to support tab à create new ticket

Then they will provide you access to your BPOS admin account

    * Access to the FOPE administration website at https://admin.messaging.microsoft.com

    * Access to the quarantine website at https://quarantine.messaging.microsoft.com

 Frist use https://admin.messaging.microsoft.com

Username : your primary email account

Password : For password need click  “need password” link

 By using Admin URL you add users and administer FOPE and other things . Quarantine link will give you view to your spam quarantine and move to inbox if need

Leave a comment

Filed under cloud computing

Installing and configuring DLINK DWA 525 wireless network adapter (N 150) in Ubuntu 11.04


I have downloaded linux ver driver for  DLINK DWA 525 wireless network adapter driver and extract it to directory

Then I install it as instructed by the read me file ( using “ make  and make install commands ) the driver has installed successfully But  not able to connect with my wireless network

After lot of googling I have found one solution in blog here am republishing it


1. Install the card and power up the machine.

2. Open the terminal and run

lspci

In the list you will see:

Network Controller: Ralink Device 3060 0

So now we know what device we need drivers for.

3. Go to http://www.ralinktech.com/support.php?s=2 and download the RT3062PCI/mPCI/CB/PCIe(RT3060/RT3062/RT3562/RT3592) drivers.

You’ll be prompted for your name and email but you don’t need to sign into anything.

4. Extract the package and cd to the directory.

5. We need to make a slight modification to the configuration for the driver:

nano os/linux/config.mk

And set:

# Support Wpa_Supplicant
HAS_WPA_SUPPLICANT=y

# Support Native WpaSupplicant for Network Manager
HAS_NATIVE_WPA_SUPPLICANT_SUPPORT=y

By default they are both set to ‘n’. Save and close the file.

6. From the top level directory, compile and install the driver:

sudo su
make && make install

You need to use ‘sudo su’ and not just ‘sudo’ so it creates the directories properly.

7. After compilation, and whist still root, modprobe the driver:

modprobe rt3562sta

You should get no output signalling success.

8. Now an important step. We need to blacklist a conflicting driver that will be loaded preferentially for this network card.

sudo nano /etc/modprobe.d/blacklist.conf

and enter the following line at the bottom of the file:

blacklist rt2800pci

Save and close.

9. Restart the machine.

10. When the machine is back up, verify the driver has been loaded and is being used by the device:

lsmod

You should see the following in the list:

rt3562sta     924607     1

11. Now, launch the Network Manager and it should have detected the available wireless networks and you can configure the one you want.


For more details go here

2 Comments

Filed under linux, wireless

IIS7 and above versions rejecting URLs containing +


When hosting Sites with iis 7 ,7.5 (in my case it was a DNN CMS site)  I got 404.11 Error says “The request filtering module is configured to deny a request that contains a double escape sequence”

Error Details:

HTTP Error 404.11
The request filtering module is configured to deny a request that contains a double escape sequence

Cause:

Microsoft Says “The IIS7 request filter rejects URLs containing + characters. We do this because the + character is a dangerous choice. Some standards, e.g. the CGI standard require +’s to be converted into spaces. This can become a problem if you have code that implements name-based rules”

Solution

I have found one solution …just sharing with you guys

Just run the following command on your Webserver to allow the Double escaping in the URL . You can use this for whole server or a particular site

%windir%\system32\inetsrv\appcmd set config “Default Web Site” -section:system.webServer/security/requestfiltering -allowDoubleEscaping:true

Wanna more.. here

🙂

Leave a comment

Filed under Webhosting

Windows update services missing in XP


Note able to run Microsoft windows update service as usual I go to services.msc to start the services that require run updates

1 Automatic updates

2 Background intelligence transfer service

But the Automatic updates service is not available there

Then to install the service

Go to inf directory in the system root folder normally c:\windows ,by default its  a hidden folder then you need to check off hide system folder option in Folder options

Right click “ au” in inf folder and “install

Click Browse. Locate and then click the %windir%\ServicePackFiles\i386 folder if the following conditions are true:

  • You installed Windows XP SP2 from a Windows XP SP2 CD that included SP2 as part of the base installation.
  • You downloaded and installed Windows XP SP2 from the Microsoft Web site.
  • Windows XP SP2 was included with the computer.

Note If the ServicePackFiles folder is not present on the computer, you can copy the files from a slipstreamed Windows XP SP2 installation CD.

Click OK to copy the files.

Note:

Change the setting on the computer not to display hidden files and folders. To do this, follow these steps:

On the Tools menu, click Folder Options, and then click the View tab.

In the Advanced settings list, click Do not show hidden files and folders under Hidden files and folders.

Click Apply, and then click OK.

Restart the computer.

2 Comments

Filed under Uncategorized

Endian Firewall Community Edition ( Free proxy and firewall )


” Endian Firewall Community Edition” is what am currently working with , Endian has both UTM devices for enterprise organizations and community edition for small bussieness

its a simply great product Now am using two features of endian

Endian Squid proxy and Firewall

Endian is one of the best free  Poxy and Firewall i suggest

Just Try..!!

Leave a comment

Filed under Uncategorized

Active Directory Lightweight Directory Services (ADLDS)


For installing and configuring AD LDS Instance in windows 2008 Server follow the links

http://technet.microsoft.com/en-us/library/cc754486%28WS.10%29.aspx

http://sharepoint-2010-world.blogspot.com/2011/03/installing-active-directory-lightweight.html

Leave a comment

Filed under Uncategorized

Xp internet security 2011 -Malware removal


“Xp internet security 2011” is a rogue malware will produce fake protection alerts and deny you from acess or download antimalware programs

Removal steps

This malware /virus would block you to run anti malware programs So we need to stop the virus processess first So….

1 . Download rkill from http://www.bleepingcomputer.com/download/anti-virus/rkill

2. save it in to desktop

3. double click the exe to run rkill

rkill will stop all the process related with “Xp internet security 2011”

Do not restart the machine after rinning rkill

4. Dowload latest version of Malwarebytes from http://www.malwarebytes.org

5. install and update malwarebytes

6.give a full scan

7. Remove detected treats after scan and restart the machine

Leave a comment

Filed under Uncategorized

Exchange public folder uses to share Outlook Local address book and create common calendar


With the help of exchange public folder features we can do different things that will satisfy your clients (users) daily needs

Recently I have use this features to share local address book of one user to others and also I have created Global calendars also that every one in the organization can view and edit the calendar

In this scenario We  have Exchange server and client outlook 2007

To create Global calendar


  • 1. Log into your mailbox using Outlook, navigate to Public Folders > All Public

Folders and locate the necessary Top-Level Public Folder. Right-click on it and             select New Folder in the pop-up menu.

  • Type in a name for the Shared Calendar, select Calendar Items in the Folder Contains drop-down list and hit OK.

2.  In order to set up the subfolder as a Shared Calendar, you will need

to assign client  permissions for this folder:

  • Right-click the Shared Calendar folder, select Properties.
  • Go to Permissions tab.
  • Hit Add and choose users and/or groups you wish to grant access permissions to.
  • Select required permissions level in the appropriate drop-down list and hit OK.


To Share the local address book of a user

Go through the same way above

Remember to select contacts as the Folder contains in step 2

Then open your Local address book and drag the contacts to new contacts foder uner public folder >> all public folder


Looks fine na !!!!!!!!

Leave a comment

Filed under Uncategorized